Introduction,
Selling products online isn’t just about listing them; it’s about making them look amazing. High-quality product photos can make a huge difference in attracting customers, increasing sales, and building trust.
Think about it: would you buy something online if the picture looked unprofessional or blurry? Probably not. That’s why taking great product photos matters so much in eCommerce.
But don’t worry, you don’t need to be a professional photographer or invest in fancy equipment to get started.
With a bit of guidance, some basic tools, and practice, anyone can take photos that show off their products in the best light—literally and figuratively.
Why Good Product Photos Are Essential
When shopping online, people can’t touch, feel, or try out your product. Photos are the only way they get to see what they’re buying.
Studies show that 93% of people say visuals are the key deciding factor in a purchase. This means poor photos could cost you sales, even if your product is great.
Clear, well-lit, and appealing images give shoppers confidence. They’ll trust the quality of the product, understand its features better, and feel more comfortable buying it.
A good photo not only captures attention but also tells a story about your brand and product.
What You’ll Need to Take Product Photos
You don’t need a professional studio setup. Here’s what you’ll need to start:
- A Camera: A DSLR is great, but your smartphone might work just as well. Modern phones have excellent cameras that can produce professional-quality photos.
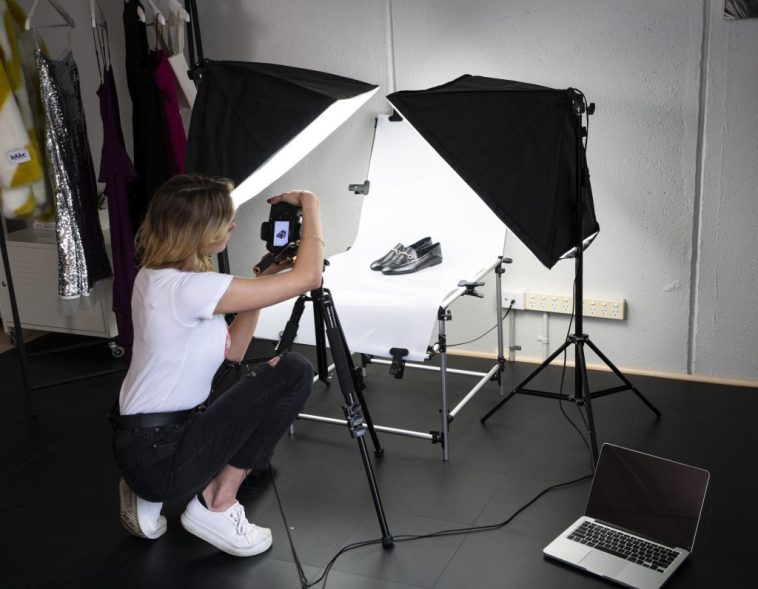
- Lighting: Good lighting is key. Natural light works wonderfully for many products, but you can also invest in affordable softbox lights for consistent results.
- Background: A clean, clutter-free background (like a plain white poster board) helps the product stand out.
- A Tripod: This helps avoid blurry images and keeps your shots consistent.
- Editing Software: Even basic editing tools like Adobe Lightroom, Canva, or Snapseed can make your photos pop.
How Do I Take eCommerce Product Photos?
Step 1: Set Up Your Space
Choose a well-lit area with plenty of natural light. If sunlight isn’t an option, position a couple of softbox lights around the product.
Use a plain white background to make your product the focus. You can create a DIY setup with a white poster board or a fabric sheet.
Step 2: Stabilize Your Camera
Use a tripod for consistent angles and sharp images. If you don’t have one, place your camera or phone on a stable surface.
Step 3: Experiment with Angles
Take shots from different perspectives. Show the product from the front, back, sides, and top. Highlight its details or features. For example, if you’re selling a watch, zoom in on the clasp or the dial design.
Step 4: Use the Right Lighting
Lighting makes or breaks your photo. If you’re using natural light, shoot near a window during the daytime.
Avoid direct sunlight, as it can cause harsh shadows. If you’re using artificial lighting, position the lights to minimize shadows.
Step 5: Avoid Reflections
For shiny products like jewellery or glass, reflections can be tricky. A light tent or diffused lighting can help soften these reflections.
Step 6: Take Multiple Shots
Don’t just snap one picture and call it a day. Take several photos from different angles and lighting setups. This gives you more options to choose from when editing.
Step 7: Edit Your Photos
Editing can elevate your photos from good to great. Adjust brightness, contrast, and sharpness. Crop the image to centre your product. Just don’t overdo it—your photos should still look natural.
Tips for Specific Types of Products
- Clothing: Use mannequins or models. Show how the fabric drapes and include close-ups of textures and patterns.
- Jewellery: Use a macro lens (or your phone’s macro mode) to capture fine details. Keep the background minimal.
- Food: Natural light works best. Include some props (like cutlery or ingredients) to make the shot more inviting.
- Electronics: Clean the product thoroughly to avoid dust or smudges appearing in the photos. Use a sleek, modern background.
Common Mistakes to Avoid
- Poor Lighting: Dim or uneven lighting can make products look dull or unappealing.
- Cluttered Backgrounds: A busy background distracts from the product.
- Blurry Images: These look unprofessional and can make shoppers doubt the product’s quality.
- Over-editing: While editing is helpful, overdoing it can make the product look unrealistic.
FAQs
1. Do I need a professional camera to take good product photos?
Not necessarily. Many smartphones have cameras that are more than capable of taking high-quality product photos.
2. What’s the best time of day to use natural light?
Mid-morning or late afternoon usually provides soft, even lighting that’s perfect for photos.
3. Can I use my phone for editing?
Yes, apps like Snapseed and Lightroom Mobile are great for editing photos on your phone.
4. How many photos should I include for each product?
Aim for at least 4-6 photos. Show different angles, close-ups of key features, and the product in use if possible.
5. What if I don’t have a plain white background?
You can use a clean bedsheet, a large piece of white cardboard, or even create a digital background during editing.
Wrapping It Up
Taking great eCommerce product photos isn’t as hard as it might seem. With the right setup, a bit of practice, and attention to detail, anyone can create images that make their products shine.
Remember, your photos are like a salesperson—they should show off the product, highlight its best features, and convince customers it’s worth buying.
What’s been your biggest challenge in taking product photos so far? Let me know—I’d love to help!


GIPHY App Key not set. Please check settings