Introduction.
Video editing used to be something only professionals could do with fancy software and expensive tools.
Now, apps like Canva have made it super easy for anyone to create great-looking videos.
Make sure to subscribe to this article
Whether you’re a content creator, small business owner, or just want to spice up your projects, Canva gives you everything you need in one place. No need to spend hours figuring things out—it’s user-friendly, even if you’ve never edited a video before.
In this guide, I’ll break down how you can use Canva to edit videos, step by step.
By the end, you’ll have all the tools to start creating videos that look polished and professional, even on a budget.
Why Canva for Video Editing?
You might know Canva for its easy-to-use templates for graphics, but did you know it’s also great for videos?
Canva lets you edit videos without needing technical knowledge or powerful computers. All you need is an internet connection.
Some reasons I love using Canva for video editing:
- Ease of Use: Everything is drag-and-drop, and there are no complicated menus.
- Free Tools: Canva has a free version with plenty of video editing features.
- Templates Galore: Pre-designed templates make starting a project simple.
- Collaborative Features: If you’re working with a team, you can share your video for real-time feedback.
It’s especially handy for social media videos, presentations, and marketing materials.
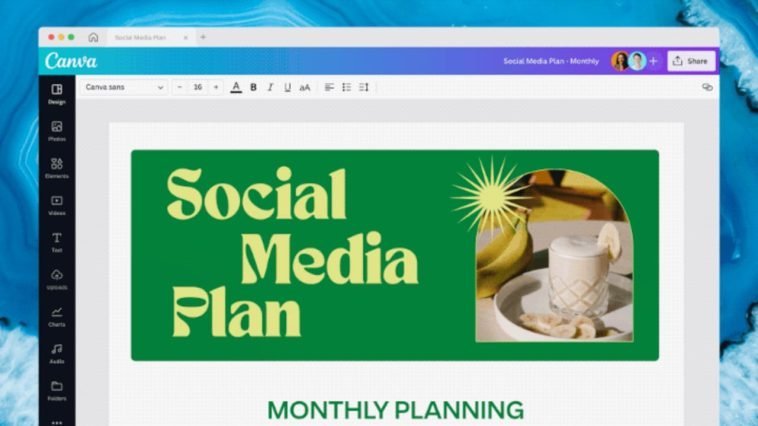
Getting Started: A Quick Overview
Before diving in, create an account on Canva (if you don’t already have one). The free version has most of what you’ll need.
However, upgrading to Canva Pro unlocks extra features like premium stock videos, animations, and music tracks.
Here’s what to do next:
- Log in to Canva.
- Click on “Create a Design” and choose Video from the dropdown menu.
- Browse through the video templates to find one that fits your style.
How Do I Edit Videos with Canva?
1. Pick a Template or Start from Scratch
If you’re new to video editing, templates are a great starting point. Canva has options for everything: Instagram stories, YouTube intros, or simple slideshows.
- Templates: Pre-designed layouts with fonts, animations, and placeholder content. You just replace the text or videos with your own.
- From Scratch: Want full control? Start with a blank canvas and build your video from the ground up.
2. Upload Your Media
Add your videos, photos, and audio by clicking on the Uploads tab in the sidebar. Canva supports most file formats, so you don’t have to worry about compatibility issues.
Pro Tip: If you don’t have your own footage, Canva’s library is packed with free and premium videos, photos, and music tracks.
3. Arrange Clips on the Timeline
Canva’s timeline makes video editing straightforward. Drag and drop clips to arrange them in the order you want. You can also trim clips by selecting them and dragging the edges to shorten or lengthen their duration.
4. Add Text and Graphics
Want to include subtitles, titles, or captions? Head to the Text section and choose from Canva’s font styles. You can also adjust colours, sizes, and effects like shadows to make your text pop.
5. Customize with Effects and Transitions
Click on any element in your video to add animations or transitions. For example:
- Fade-in effects for text.
- Slide transitions between clips.
- Zoom effects for images or videos.
This is where your video gets that polished, professional feel.
6. Add Music or Voiceovers
Background music can transform your video. Go to the Audio tab to browse Canva’s library of tracks. You can also upload your music or voiceovers for narration.
Pro Tip: Adjust the volume of your audio tracks so they don’t overpower your visuals.
7. Preview and Adjust
Once everything looks good, hit the Play button to preview your video. This helps you spot any errors, like mismatched transitions or text that doesn’t line up properly.
8. Export Your Video
When you’re happy with the final product, click Share and then Download. Choose the file format (MP4 is the most common for videos), and you’re good to go!
Tips to Make Your Canva Videos Stand Out
- Keep It Simple: Don’t overload your video with too many effects or elements. Clean and clear is always better.
- Use High-Quality Media: Grainy footage or pixelated images can make your video look unprofessional.
- Stick to a Theme: Canva’s templates make this easy. Use consistent colors, fonts, and styles for a cohesive look.
- Optimize for Platforms: If it’s for Instagram, go vertical. For YouTube, stick to horizontal. Canva has templates for both.
FAQs
Q: Is Canva’s video editing free?
A: Yes! Canva offers free tools for video editing, but you can upgrade to Pro for additional features like premium templates, stock assets, and unlimited storage.
Q: Can I use Canva videos for commercial purposes?
A: Yes, as long as you use media marked for commercial use. Be sure to double-check the licensing for any stock content.
Q: Does Canva support 4K video?
A: Canva’s export options are limited to 1080p (Full HD) for now. It’s good enough for most online platforms.
Q: Can I edit videos on my phone?
A: Absolutely! Canva’s mobile app is just as functional as its desktop version, so you can edit videos on the go.
Wrapping It Up
Canva is an excellent tool for anyone looking to dive into video editing without a steep learning curve. It’s simple, intuitive, and packed with features that let you create professional-looking videos in minutes. From social media posts to personal projects, the possibilities are endless.
What kind of video would you like to create using Canva? Let me know in the comments—I’d love to hear your ideas!

GIPHY App Key not set. Please check settings